|
Astro Gadgets! Amateur and Professional Astronomy Instrumentation Projects Implemented by Jeffrey R. Charles © Copyright 1982, 1998, 2004, 2005 Jeffrey R. Charles. All Rights Reserved. New text and images may be added as time permits. |
|
Introduction:
Ever needed a gadget to perform a task, but found that no one made such a thing? This can happen to any of us, and occasionally, if we want or need a certain gadget bad enough, we will just go and design it, build it, and hopefully even use it! This was the case with some of my projects. Over the years, I invented numerous gadgets and designed several modifications to existing equipment, but it was not always practical to implement all of these innovations in the available time. This chapter covers a selection of gadgets and improvements that were actually implemented. Some of the innovations were developed for my own amateur use, while others started out as amateur projects and eventually became products of my business, Versacorp (TM, SM), due to popular demand. Still other innovations were developed for commercial purposes from the start, and some were patented. Additional amateur and commercial projects are covered in the eclipsechaser.com and versacorp.com web sites. |
A Unique All-sky and Panoramic Capture Reflectors
| 
|
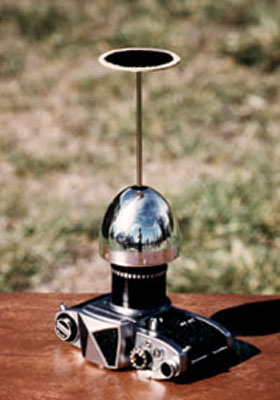
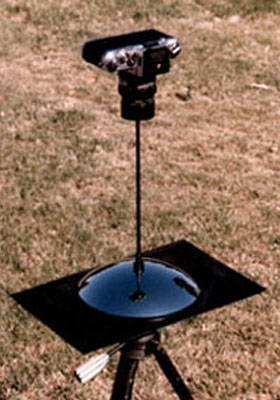
| Left: Cassegrain axial strut wide angle reflector I invented and built in 1977. This system initially used a parabolic projector bulb reflector. This L'eggs egg has been used as the primary reflector since 1978. This system allows the camera and photographer to be behind the primary reflector and out of the 300 degree plus field of view. When used vertically, this system instantly captures a 360 degree panorama in circular form. The axial rod supports the secondary reflector without obstructing any of the subject area. Right: Axial strut wide angle reflector which utilizes a hubcap reflector. This system facilitates use of an f/ratio as fast as f/2. I subsequently obtained several patents for improvments on these concepts. For more information, please see my paper: All-sky Reflector with "Invisible" Axial Camera Support. | |

| 
|
| Left: Image captured in 1977 with Cassegrain axial strut wide angle reflector. A projector bulb reflector was used for this image. Right: Image captured in 1986 with axial strut hubcap reflector. | |
Return to Local Table of Contents
Converting a 90-230 mm Soligor T4 Lens to an Erect Image Zoom Telescope

| 
|
| Left: Soligor 90-230 mm f/4.5 T4 zoom lens on my Miranda Sensorex 2 camera. The Miranda was my only 35 mm camera from 1973 to 1977. The heavy but well balanced 1 kg weight of the lens combined with the front shutter release on the Miranda camera made it practical to take sharp hand held available light pictues at down to 1/8 second. Right: Optics in a Kodak film can are adapted to the back of the zoom lens by fitting the film can to a Miranda lens mount to C-mount adapter. A 25 mm f/2.5 Wollensak movie camera lens is used as the erecting lens and two positive elements from inexpensive movie projector lenses are used for the 10 mm eye lens. The eye lens has a dramatic 80 degree apparent field of view, but has some pincushion distorton. Aberrations are acceptable over most of the field due to characteristics of the selected erecting lens. | |
Return to Local Table of Contents
Fantastic Rich Field Views Through an 800 mm f/8 Soligor Camera Lens

| 
|
| Left: Near the time of the February 1979 total solar eclipse, I began to have significantly increased interest in Astronomy. Prior to this time, I had not known that some deep sky objects were bright enough to detect with the naked eye, and that still more were visible in binoculars and small telescopes. This 800 mm f/8 Soligor lens had been a showpiece in the local camera store for years. It had been purshaced in 1978 by a gal who did not use it much, and she offered it for sale at under half of its new price in the summer of 1979. I jumped at the chance to get the lens and began using it as both a camera lens and telescope. For my first eyepiece, I mounted two positive elements from a slide projector lens in a paper towel tube and slipped it into the back of the lens. This long focal length Ramsden eyepiece had severe off-axis aberrations, but the contrast and resolution at the center were unmatched by any eyepiece or camera lens had seen up to the time. I later got a brand new 55 mm f/1.4 Mamiya camera lens for $10 when Woolco started running closing out their photo equipment. When combined with a reverse ring and a couple of other fittings, this lens made a pretty good eyepiece, with good off-axis correction but lower contrast than my home made Ramsden. I occasionally stacked the lens with a 200 mm focal length singlet lens to make it operate more like a 45 mm eyepiece with a wider apparent field. The views were fantastic, and I used this telescope all the way up to when I got a 94 mm Vernonscope refractor in 1991. At that time, my brother bought the 800 mm lens to use at the 1991 total solar eclipse in Mexico. Shortly before selling the lens, I got a 48 mm Brandon eyepiece. This eyepiece had the contrast of my early hime made Ramsden eyepiece, plus a wider apparent field and off-axis correction that was comparable to the eyepiece made from the 55 mm Mamiya lens. Right: Moses, my astro cat, takes in a view of M42 through the 800 mm focal length rich field telescope. | |
Return to Local Table of Contents
A Souped Up Celestron 90 on a Quantum Four Motor
Base;
Other Telescope Projects
 |
 |
 |
|
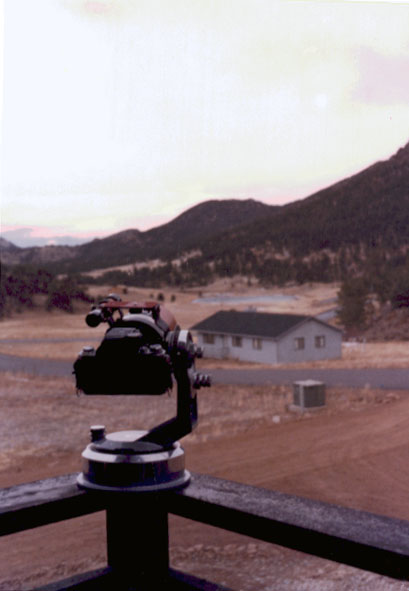
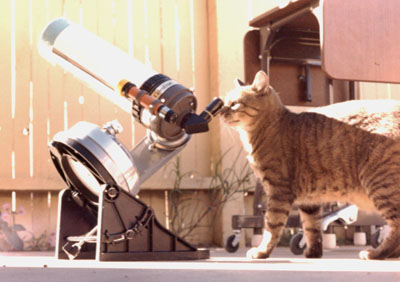
| Left: My trusty Quantum 4 motor base and Celestron 90 telescope take in a 1981 moonrise at Estes Park, Colorado. The home made telescope adapter also serves as a piggyback camera mount. To provide quick switching between a camera and eyepiece, I used an Ad-Astra star diagonal with a Nikon mount adapter on the front. The light baffle in Celestron 90 itself was modified to eliminate fogging in corners of the 35 mm format. Upper Right: My cat Moses looks through my C90 telescope. Under these circumstances, one could say that this is a "cat-eye-dioptric" telescope! Lower Right: Moses the astro-cat liked looking through other telescopes as well. Here, he is looking at birds through a Questar. So close, and yet so far! | |
Return to Local Table of Contents
Quick Release Star Diagonal for Celestron 90

| 
|
| Left: In 1979, I combined an Ad-Astra star diagonal with a Nikon mount adapter for Vivitar T-thread bellows to make a Nikon mount star diagonal! While this diagonal requires too much back focus for a camera lens, it works just fine as a star diagonal that can be quickly interchanged with a camera on a suitable telescope. Right: The quick release star diagonal is right at home on my Celestron 90 telescope, where it also improves on the C-90's standard 0.965 inch diagonal by accepting 1.25 inch eyepieces. This diagonal made observing and photography with the C-90 easier and more enjoyable. The assembly on top of the C90 is a custom made piggyback mount and carrying handle. | |
Return to Local Table of Contents

| 
|
| Left: This solar projector was made from a collection of on hand material, including a cardboard tube, mylar drawing material, antique spot light projection lens, and a plastic magnifying lens that came free in a box of Captain Crunch cereal. In spite of its humble origins, the solar projector can resolve sun spots. Right: Solar image formed at back end of projector. The projector has some adjustment to make moderate variations in the image size. | |
Return to Local Table of Contents
VersAdapter (TM) Multiple Function Eyepiece and Camera Adapter

| 
|
| Left: VersAdapter (TM) multiple function eyepiece and camera adapter. Right: VersAdapter and 1.25 inch eyepiece on 400 mm camera camera lens. | |
Return to Local Table of Contents
VersAgonal (TM), Multi-function Flip Mirror
Attachment.
Building the First VersAgonal as an Amateur Project.
| |
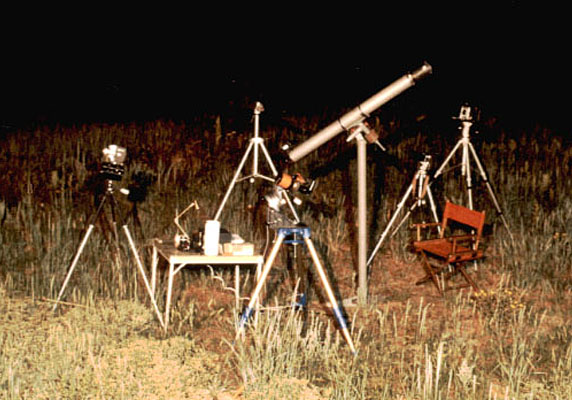
| Several telescopes and cameras await a 1982 lunar eclipse. Before I had a flip mirror, multiple telescopes were required to observe and photograph an event without refocusing. The largest telescope is a 101 mm f/15 refractor that was made mostly from parts I purchased from the Star Tracker in Boulder, CO on 5 September, 1980. | |
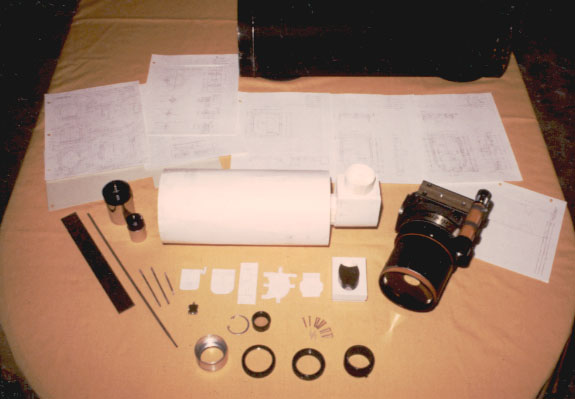 | |
| The VersAgonal starts out as a need, then it becomes an idea, then an assembly of plans, parts, and raw materials. The plans and some parts are shown with a model of the VersAgonal and 12 cm telescope in this late 1982 photo. My Celestron 90 and its custom reversible dewcap are shown toward the right for scale. | |
| |
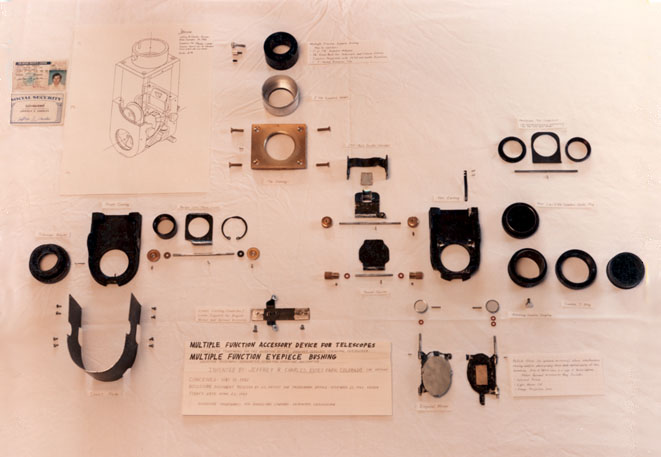
| Nearly 100 parts were required for the first multi-function VersAgonal. Its aluminum sand castings were made with the use of balsa wood patterns I carved and assembled. Other than having the multi-function eyepiece adapter, the knobs, and three large diameter threads made at a machine shop, the prototype was made entirely with the use of simple tools. A few peripheral parts were purchased. These include the eyepiece holder, Barlow lens cell, and camera adapter. The front of the VersAgonal has T-threads, allowing it to fit virtually any telescope having enough back focus. The VersAgonal is a two inch diagonal with 1.25 inch adapter, a 1.25 inch visual back for straight through viewing, a camera adapter, a flip mirror, a photo visual Barlow, an off-axis guider guider with a sliding and tilting reflector, a beam splitter, a manual shutter to interrupt guided exposures, an eyepiece projection adapter, and more! A built-in photo visual telecompressor can be substituted for the built-in adjustable guiding prism. A spear prism guider is then used for guiding. The VersAgonal provides three visual magnifications and four photographic focal lengths with just the turn of a knob - without even removing the eyepiece or camera! I have two patents for commercial versions of the VersAgonal and one patent for what later became known as the spear prism guider. Patent numbers are indicated in product data at the www.versacorp.com web page. | |
| |
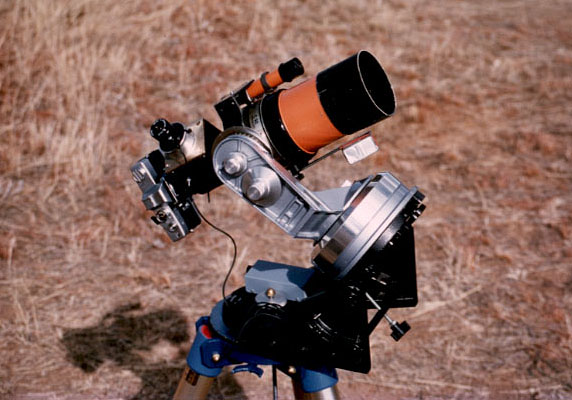
| The tail wags the dog as the VersAgonal makes its debut on my Celestron 90 telescope. | |
 |
|
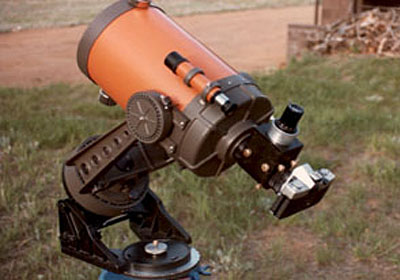
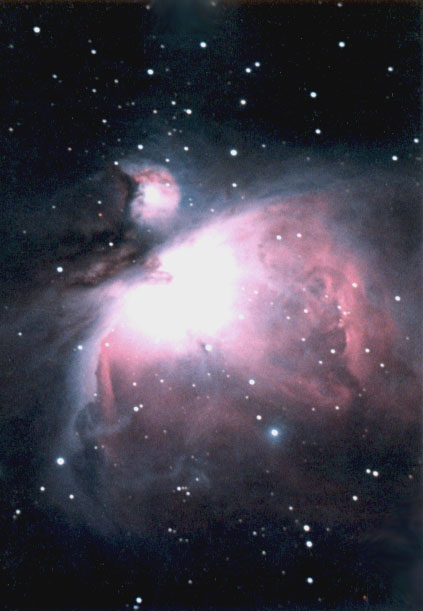
| Left: By early 1983, the completed VersAgonal prototype was right at home on an eight inch (20 cm) Schmidt Cassegrain telescope. The telescope even fits in its case with the VersAgonal attached! Right: M42, the great nebula in Orion, photographed with a Celestron 8 telescope and the VersAgonal. | |
Return to Local Table of Contents
The VersaGuider (TM), a Versatile Off-Axis Guider Insert

| 
|
| Left: Originally conceived in 1980 as a guider insert for the Questar (TM) 3.5 flip mirror control box, the VersaGuider (TM) was not commercialized until 1984, when it was introduced as part of the Versacorp (TM, SM) VersAgonal (TM) system. It was subsequently offered for the Questar 3.5 and 7, the Quantum 4 and 6, and the Celest-Ease (TM) System 8 backmount, a large control box assembly for a Celestron 8 that was briefly offered by the Star Tracker in Colorado. Right: Special version of VersaGuider insert on Questar 3.5 telescope. The custom camera adapter shown here is about the same length as the standard Questar camera coupling, but includes a manual shutter plate to interrupt exposures. The short length of the camera coupling allows the camera to be at the optimum close coupled position for deep sky astrophtography. | |
Return to Local Table of Contents
Collapsible Roll-Up Dewcap for Telescopes

| 
|
| Left: 1985 concept drawing of collapsible roll up dewcap. Right: Collapsible dewcap. | |
Return to Local Table of Contents
MicroDec (TM) Declination Slow Motion for Questar 3.5

| 
|
| Left: I first conceived of the MicroDec declination slow motion control in 1980, but since it was difficult to properly implement with simple tools, I did not get to build one until I acquired machine tools some 5 years later. Introduced commercially in 1986, the MicroDec (TM) is a compact tangent arm type declination slow motion control that can be left on a telescope even when it is not in use. For use, a simple clutch is engaged to grip the telescope declination control knob. Right: MicroDec on Questar 3.5. | |
Return to Local Table of Contents
Declination Range Extender for Duplex Questar 3.5

| 
|
| Left: Declination range extender. Right: Declination range extender on Duplex Questar 3.5. | |
Return to Local Table of Contents
VersaGuider (TM) 3, Low Profile Off-Axis Guider for Questar 3.5

| 
|
| Left: In 1985, I started experimenting with a custom body for my VersaGuider guiding insert. The VersaGuider 3 combines the VersaGuider insert concept with a custom guider body having a manual shutter plate. The low profile guider body allows the Questar 3.5 inch telescope to operate at a faster effective f/rario for guided photography. Some versions made after 1987 also accepted filters. Right: VersaGuider 3 on Questar 3.5 telescope. | |
Return to Local Table of Contents
The DiaGuider (TM), Multi-Function Diagonal and Off-Axis Guider
|
|
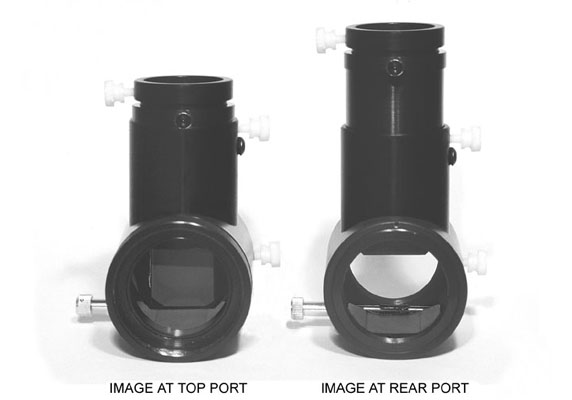
| Left: The patented DiaGuider (TM) was originally conceived as a commercial product. In late 1986, I built the first one in much the same way as some of my better amateur projects. The prototype worked just as intended, and it sold as a commercial unit as soon as it was introduced as a product in 1987. With its prism assembly down as shown here, the DiaGuider is a high quality star diagonal. Right: With the prism partway up, the DiaGuider is an adjustable off-axis guider, and with the prism all the way up, it is a simple camera adapter. The moving prism of the DiaGuider makes it well suited to visually acquiring objects for film protography or electronic imaging. |
Return to Local Table of Contents
VersaDrawer (TM) Filter/Optic Drawer and Modular Optidisc (TM) Inserts

| 
|
| Left: VersaDrawer with OptiDisk (TM) insert and filter adapter ring. Right: VersaDrawer and DiaGuider on telescope. | |
Return to Local Table of Contents
VersaTrack (TM), Compact Pocket Size Digital Quartz Drive Corrector

| 
|
| Left: VersaTrack. Right: Inside of VersaTrack. | |
Return to Local Table of Contents
Pocket Size Telescope Converter for Binoculars
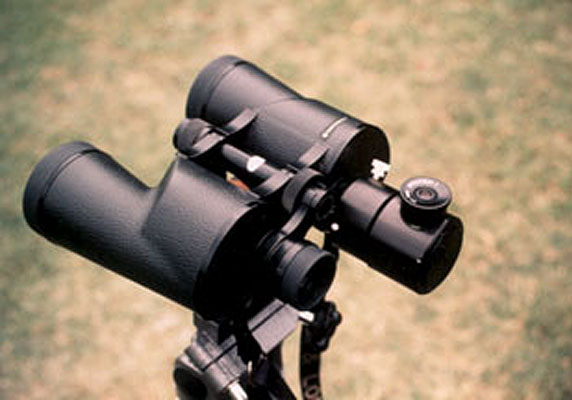 | |
| This patented telescope converter attachment for a binocular accepts 24.5 mm diameter eyepieces. With the shown 9 mm eyepiece, it increases the 10x magnification of the binoculars to 40x. The other side of the binocular can be used as the finder scope. The front section of the adapter is interchangeable to accommodate different binoculars. The patent (D312,087, issued in 1990) is available for license. |
Return to Local Table of Contents
An Eight Inch Newtonian that Stores in its Mounting
| 
|
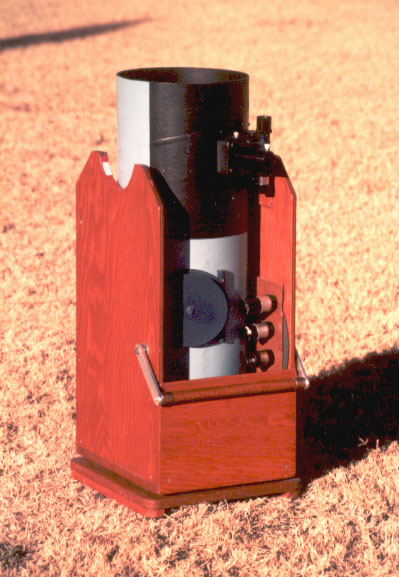
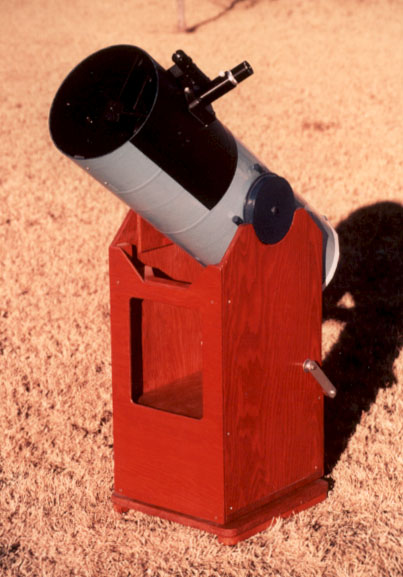
| Left: This 20 cm f/4 Newtonian telescope stores in its own mounting. The entire assembly is easy to carry and weighs only 14 kg. Right: The telescope literally sets up in seconds; just pull the tube out of the mount and set it in the altitude bearing cradle. The eyepiece tray (also shown in the left image) fits in the base under the telescope and provides a convenient platform on which to set accessories. It also encloses a roomy area in the bottom of the mount to keep items such as a camera, lens covers, aperture masks, star charts, etc., secure and out of the wind. The eyepiece angle of 45 degrees permits a seated observer to comfortably view subjects at all elevation angles. The telescope also uses a 14 inch computer hard drive disk platter as the azimuth surface, and has masks (covered below) that reduce flare and permit more effective use when viewing dim objects next to bright light sources. One attribute of this telescope was mentioned as being one of the "10 Best Ideas for 1990" in Astronomy Magazine | |
| 
|
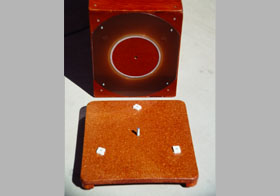
| Left: The 20 cm f/4 Newtonian telescope uses a 14 inch computer disk as its azimuth bearing surface. I used the disk because it was on hand and looked like it had a suitable surface. Right: The built in carrying handle makes the telescope and its mount easy to transport. | |
Return to Local Table of Contents
Baffles and Spider Masks for Reduction of Flare and Diffraction Spikes
| 
|
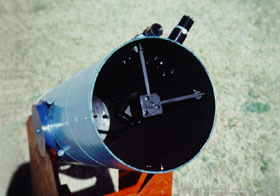
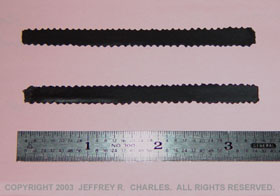
| Left: Ever wanted to eliminate diffraction spikes from a secondary mirror spider? In 1990, I added flat, scalloped masks to my 20 cm f/4 Newtonian telescope to eliminate visible diffraction spikes that would otherwise be caused by the spider. Right: Detail of the prototype spider masks. The original concept was to have a serpentine outline, but the prototype was made with a scalloped edge because this was easier to build - all I had to do to make the shown masks from card stock was notch the edges with a paper punch! | |
| 
|
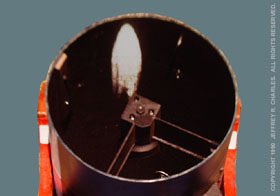
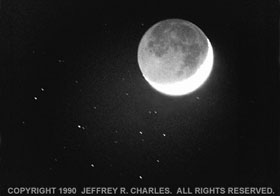
| Left: Ever wanted to see deep sky objects that are only a few degrees from a local street light or observe planets during the day while they are only several degrees of the sun? The first night I used my 20 cm Newtonian telescope with the spider masks, I performed some tests and realized that the masks could be used to solve a different problem - masking illumination of the spider by nearby streetlights. The next day, I moved the masks to the back of the spider as shown, where they very effectively masked illumination of, and low angle reflections from, the sides of the spider vanes. This improvement, plus a thin mask around the secondary obstruction, make it more practical to observe dim deep sky objects even when the spider is illuminated by nearby street lights. The masks, combined with other baffles and precautions, also improve performance when observing objects (Venus, for example) when within several degrees of the sun. Some described aspects of the 20 cm Newtonian telescope are also mentioned on pages 28, 103 and 292 of my book, "Practical Astrophotography", which was published in 2000 by Springer-Verlag. I had first conceived of and tried the mask concept when building a 101 mm refractor from parts acquired in 1980, when I incorporated a mask slightly smaller than the aperture immediately behind the lens cell, to block low angle reflections from the objective lens retaining and spacing rings. I later applied these concepts to other telescopes, including my Vernonscope 94 mm refractor, while modifying it for the 1991 total solar eclipse. Right: Effectiveness of masks on the 20 cm Newtonian are demonstrated in this 1990 photo of the moon passing near the Pleiades. The untracked exposure is about 5 seconds at f/4 (actually f/3.7) on ISO 1600 color negative film. | |
Return to Local Table of Contents
Extreme Telecompressors (down to 0.15x) for Telescopes

| 
|
| Left: Assortment of Versacorp telecompressors that provide from 0.7x down to 0.3x reduction of focal length. Versacorp began offering video and CCD telecompressors down to 0.3x in 1987. Right: Prototype of seven element 0.15x telecompressor. | |
Return to Local Table of Contents
Compact 3.3x Achromatic Converter Lens for Video Camera

| 
|
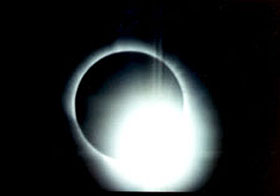
| Left: This 3.3x Galilean video converter lens, shown here on an 8 mm Sony TR-7 camcorder, was made from a binocular objective and the optics from a "shorty" style Barlow lens. Right: Video frame of the 3 Nov. 1994 total solar eclipse, taken with the 3.3x converter lens and a JVC GR-SZ7 SVHSC camcorder. | |
Return to Local Table of Contents
Quick Release System with Modular Adapters for Camera Converter Lenses

| 
|
| Left: Quick release system with VersaModule (TM) modular adapters for filters and camera converter lenses. Right: Quick release system on JVC GR-SZ7 camcorder, showing a Sigma VF-1 0.45x converter lens that is attached via the quick release adapter. | |
Return to Local Table of Contents
Iris Diaphragm and Collapsible Dewcap for Vernonscope 94 mm Telescope

| 
|
| Left: Vernonscope 94 mm refractor. Right: Iris diaphragm control ring. | |
Return to Local Table of Contents
Built-in DC Drive and Electronics for Aus-Jena Model TM Equatorial Mount

| 
|
| Left: When I first saw the Aus-Jena Model TM German equatorial mount at the 1990 RTMC, I knew it was the mount I wanted to use with my 10 cm f/8 refractor. The mount has a dovetail telescope interface and the AC motor drive is completely integrated inside the mount housing rather than being attached externally. The smooth spring loaded slow motion controls are operated by knobs on the end of short rigid shafts and not by long flexible cables that would get in the way. An Aus-Jena mount having some superficial damage was for sale at a reasonable price that year, so I bought it and made repairs. When I later obtained a 94 mm f/7 Vernonscope refractor, it was right at home on the mount. The mount's original AC drive used a very thick power cord and a huge hospital grade plug. This was replaced with a lighter cord and a standard size plug. I also added thin spring steel surfaces to the points on the slow motion tangent arms where they contact the end of the slow motion control screw shafts. This kept the rounded shaft ends from wearing into the softer metal of the slow motion tangent arm. Right: In order to make the Aus-Jena mount more portable and faciliate taking it to the 3 November, 1994 total solar eclipse in Boliva, I designed a low power pulsed DC stepping motor drive circuit and started looking for suitable motors. I ultimately ended up using the motor from a Super Polaris mount with a 300:1 gear train. This provided about 20 steps per second at the 1 rpm interface to the Aus-jena mount gear train. The only drawback to this project is that I was right in the middle of it when it became known that comet Shoemaker-Levy 9 would collide with Jupiter. Without an operating sidereal drive, I was able to observe the effects for the comet imact, but could not photograph it. | |
Return to Local Table of Contents
Using an ED Nikkor Lens as a Compact Photovisual Telescope
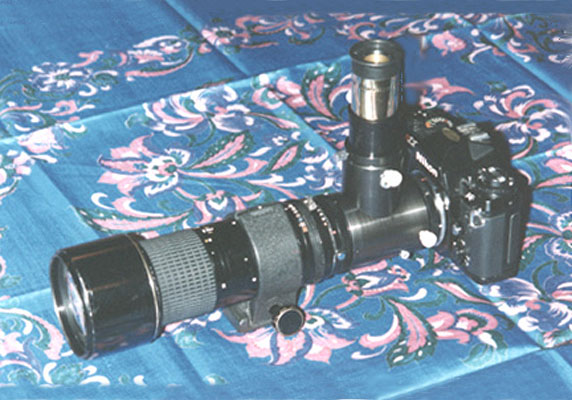 | |
| 300 mm f/4.5 ED Nikkor lens adapted to the patented Versacorp DiaGuider via the prototype VersaScope adapter. The adapter includes a special cell which positions a Dakin Barlow lens a modest distance into the rear recess of the lens. This increases the effective focal length to 640 mm and compensates for the extra back focus required for the depth of the DiaGuider. The image can be instantly switched between the eyepiece and camera with the DiaGuider, making it possible to observe and photograph with one highly portable instrument. |
Return to Local Table of Contents
Afocal Adapter for Sony DSC-F707 and Other Cameras
| 
|
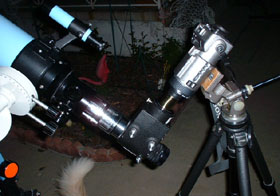
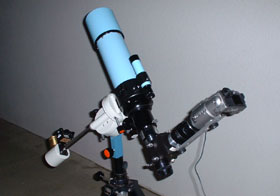
| Left: Before building the afocal adapter, I used a separate tripod for afocal photography with my Sony DSC-F707 digital camera. Right: Digital camera mounted on Vernonscope 94 mm f/7 Brandon telescope with the afocal adapter. In this setup, a Vivitar 85 mm f/1.8 lens is used in place of a normal eyepiece to get a wider field and faster effective f/ratio. | |
| 
|
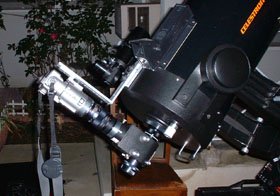
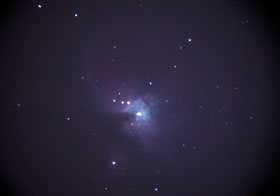
| Left: Sony DSC-F707 camera and afocal camera adapter on Celestron Ultima 11 telescope. Right: Raw 30 second exposure of M42. Taken from Arizona with a C11 and Sony digital camera on the afocal adapter. Using the 85 mm Vivitar lens instead of an eyepiece provided an effective f/ratio of about 2.4 with the utilized mid range zoom setting of the digital camera's lens. | |
Return to Local Table of Contents
Multiple Innovative Modifications for Celestron Ultima 11 Telescope

| 
|
| Left: Cross bar on wedge supports lower part of drive base for added stability. Right: Holes added to the C11 optical tube facilitate moving the tube forward in the fork mount to achieve proper balance without counterweights when using a 2 inch diagonal. The optics were obviously removed from the optical tube during the modification. | |
Return to Local Table of Contents
Multiple Innovative Modifications for Jims Mobile Celestron 11 Case

| 
|
| Left: JMI C11 case with external modifications. Right: Close up of teflon glides by case wheels. | |
Return to Local Table of Contents
Side by Side Comparison of SBIG ST-237 and Sony DSC-F707 Cameras
| 
|
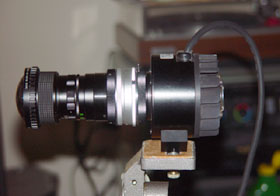
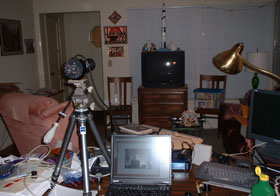
| Left: A fisheye lens is used on the SBIG ST-237 camera to provide an image scale that is equivalent to the lens on the the Sony DSC-F707, the consumer digital camera it is being compared with. The cameras were tested at the same effective f/ratio under identical illumination conditions. Right: Flash picture of SBIG ST-237 camera and a laptop computer set up for the test. | |

| 
|
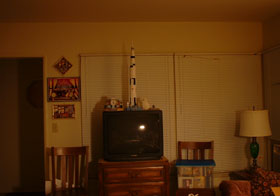
| Left: RGBL image with SBIG ST-237 camera, captured in very subdued light. Right: 30 second exposure of same subject with Sony DSC-F707 digital camera. The results of this and other tests indicated that the Sony is better than the SBIG for all subject matter in its exposure range, while the SBIG is better than the Sony for deep sky imaging via multiple RGBL images. The SBIG camera in this test is the ST-237, which has an image bit depth of only 12. The ST-237 camera will later be converted by SBIG to the 16 bits of the ST-237A and tested again. | |
Return to Local Table of Contents
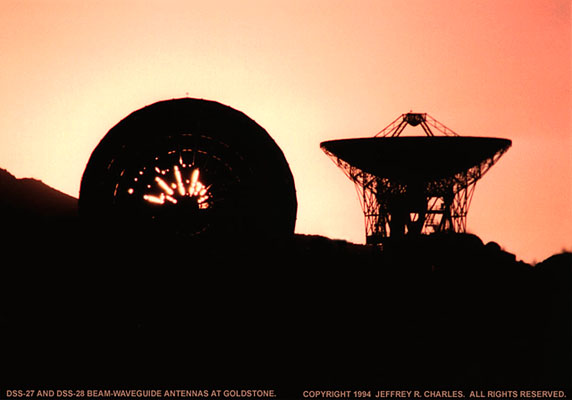
Large Aperture Optical Systems for Big Antennas
|
| The solar disk sets directly behind DSS 27 at the Goldstone Antenna range near Barstow, California. A reflector panel was temporarily removed from DSS 27 in order to facilitate installation and testing of the first boresight telescope in 1993. DSS 28 is in the background. The boresight telescope (not shown here) was designed and built as part of my contract work at the time. |
Return to Local Table of Contents
Quick Panoramas With an Indexing Rotary Camera Platform
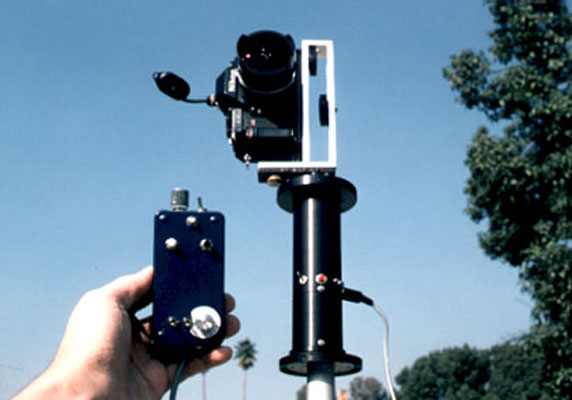 | |
| This automated remote control motorized indexing rotary camera platform was designed to take a series of photos at the total solar eclipses and other time critical events. It was used at eclipses in 1991, 1994, and 1995. When "spliced" together, the photos make up 360 degree panoramas. The platform can be configured to stop at various predetermined intervals in order to accommodate the optimum use of different camera lenses. The right angle camera bracket can position one camera directly over the center of rotation or position two cameras at equal distances from the center for stereo panoramic imaging. The hand control includes interval timers for automated operation of both the camera and platform. |
Return to Local Table of Contents
Sun Zapper (TM) Flare Reduction System for Wide Angle Optics

| 
|

| |
| Upper Left: Sun Zapper (TM) assembly. Upper Right: Sun Zapper on prototype Omnirama reflective 360 degree panoramic optical system. Bottom Left: Circular panorama captured with panoramic optical system. The image of the Sun Zapper appears to be a small dark dot directly in front of the sun. Bottom Right: Processed rectangular panorama from left image. Photo data directly adjacent to the area occupied by the Sun Zapper image was cloned into the darker imaged dot. Without the Sun Zapper, the 360 degree panoramic image would have had substantially more flare. | |
Return to Local Table of Contents
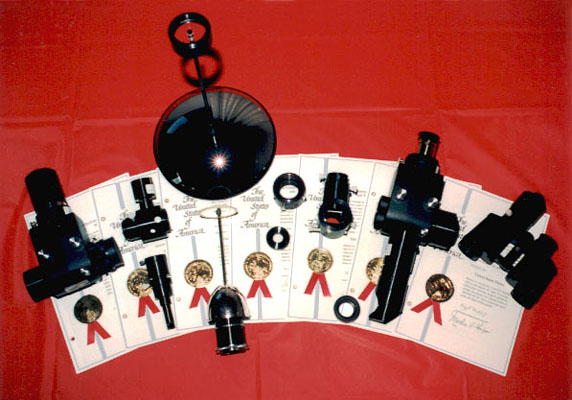
|
| Filing and prosecuting patents for a few of my inventions was one of the least enjoyable parts of going commercial. Seven of my patents are shown with related prototypes or products. Other patents for wide angle systems have been issued or are pending. From left to right (and in chronological order of filing) are: The VersAgonal; the Spear Prism VersaGuider; my All-sky and Panoramic Capture Reflectors; the DiaGuider with a Filter and Optic Drawer Attachment; a Built-in Finder and Filter/Optic Drawer for the VersAgonal; an Afocal Telescope Converter for Binoculars. One of the patents is for a miniature version of the VersAgonal that was not prototyped. |
Return to Local Table of Contents
|
Recommended Reading:
Steps to a Successful Eclipse Expedition, by Jeffrey R. Charles
Return to Local Table of Contents |
|
© Copyright 1982, 1998, 2004, 2005 Jeffrey R. Charles. All Rights Reserved.
(jcharles *at* eclipsechaser.com, or jcharles *at* versacorp.com)
Retro browser-friendly site! This web page and most other web pages at
eclipsechaser.com and versacorp.com are viewable with Netscape 2 and newer,
and only require VGA or better screen resolution. |