Taubenberg Rail Park:
|
| Taubenberg Rail Park. Contents: |
|
Introduction:
Train chasing and model railroading have always been something I occasionally like to do for recreation. Model railroading in particular can be "low tech" when compared to my professional pursuits, which means it can be relaxing and relatively free of tedium. When I was in my later years of grade school, my folks got me an H.O. model train set with two extra switches and some extra track for Christmas. This made for a more interesting layout than just an oval, and there was room in the basement to set up a four by five foot (1.2 x 1.5 meter) layout on a piece of plywood. Some distant shirt tail relatives had a really elaborate layout with many buildings, but I did not get to see it very often. When we moved from Kansas City, Missouri to Estes Park, Colorado, space was more at a premium, so the only way I could use my model railroad was to temporarily set it up on the carpet. This was not a good solution because the locomotives tended to pick up carpet fibers, which made them require frequent cleaning. Worse yet, my cat usually wanted to chase the trains. This was not all bad, but he tended to play a little rough, so he occasionally broke things. During this time, I designed the 4 x 8 foot layout that I wanted to build when finances and space allowed. I was getting into photography at the time, and my $1.36 per hour income from my part time and summer job at a grocery store could not fund both hobbies and still allow me to save anything. Also, a bicycle (for transportation to the summer job without needing a ride every time) was a higher priority. A permanent model railroad would have to wait. By the time I was in the eleventh grade, my dad decided to sell his pipe organ. I hated to see it go because he really liked working on it, and he had hoped to get it playing. After the organ was removed, a lot of space was available in the former pipe chamber. At that time, I was able to purchase two more switches and set up a 4 by 8 foot (1.2 by 2.4 meter) H.O. train layout while still in the same grade. The 4 by 8 foot layout was made up entirely of sectional track. It had two large loops which were interconnected with a crossover. The inner loop had four switches which could be used to convert its route into a figure eight. Since the layout had two blocks (and a third in progress) a train could switch directions by means of the figure eight. The double outer loop allowed one train to be run on a two lap route. With the addition of two switches on the outer loop, two separate trains could be run on separate one lap routes. The inner route would be an 18 inch radius figure eight, and the outer loop was a 22 inch radius oval. Two trains could be run without the extra switches, but they then had to be synchronized in order to prevent crashes at either of the crossovers. There was room in the same general area of the house for my brother to set up his H.O. slot track, so we got to gab with each other while we operated or used our layouts. (Notice that I did not use the term "play"!) When I got out on my own after graduation, I quickly discovered how rent increases as one's square footage increases. I wanted to have some degree of temperature control where my train layout would be, so setting one up in a garage (when a garage was even available) was not very attractive. It appeared that a four by eight layout was not in the cards, so I began designing smaller layouts, with most being 42 by 78 inches - just barely larger than a single (twin) bed. This size is also handy because it can be maneuvered through most doorways while in an upright position, particularly if it has wheels on one side. A layout similar to the one I had while in school would fit on such a board if I used 14.25 and 17.5 inch radius turns instead of the standard 18 and 22 inch radius curves. In spite of the advantages of a 3.5 x 6.5 foot layout, I really did not want to set up all of the buildings and trains every time I used them, so I decided to work toward something even smaller. In the mean time, I just had to do without. In late 1980, I was visiting some friends and acquaintances at Ravencrest Chalet, a bible school just outside of Estes Park, CO. While there, I met Todd Clemins, a student from the Milwaukee, Wisconsin area. He was an interesting fellow and we had been talking for some time when the subject of model railroading came up. At this, he became quite excited and invited me to his dorm room, where he showed me some H.O. trains which he had actually brought with him to the school. He had detailed some of his locomotives and took very good care of them, usually keeping them in their original boxes. He wanted to see my trains too, so few days later, I brought them by. After looking at my locomotives, he set some track up on the floor of the school lounge and hooked up his transformer. As we talked, we ran our trains for a half hour or so. We soon drew an audience of other students. It was fun, and I was getting hooked on trains again. A few years later, I moved to Arizona, and several years went by in which I had no room to set up an H.O. model railroad. It appeared that the only way I was going to have room for an H.O. train layout was to settle for a very small one. The problem with a small layout is that it is hard to come up with an interesting track plan. Switching directions is out of the question where the layout width is less than four times the minimum turn radii, and this severely limits options. As for the maximum board size, I noticed that it was relatively easy to clear space around a table or cabinet which would accommodate a layout of about 40 by 48 inches (1 x 1.2 meters). This size appeared to be realistic, so I worked out some track plans in 1990. One of my track plans was really good for a small space. It is a two lap layout which fits onto a 40 by 48 inch board! Its two interconnected ovals allow two trains to be run on independent one lap routes, or one train to be run on a two lap route, while still having provision to park a second one. One of the interconnecting tracks curves from the outer loop through one side of the inner loop, where it continues across and connects with the other side of the inner loop. This provides a crossover for some variety. The small layout has three blocks, three number four straight switches, and one number four curved switch. The curved switch is instrumental in getting the layout to fit the required size while still allowing the inner oval to have a 15 inch (0.4 meter) radius and the outer one to have an 18 inch (0.45 meter) radius. I finally laid the nickel-silver track for this layout in 1991. With slight modifications, all of the locomotives and cars I planned to run could reliably handle its 15 inch (0.4 meter) radius curves. I obviously was not running a 4-8-8-4 "Big Boy" locomotive or much in the way of 85 foot cars! While this layout was relatively small, it still required dedicated space if I was to avoid setting up the buildings and trains every time I wanted to use them. At this point, I decided to give N-scale layout a whirl while still hanging on to my H.O. stuff. My modest N-scale layout was similar to my H.O. one, but it had a third lap. The N-scale layout fit into a small space, but I did not like having to use a magnifying glass to see detail on the locomotives. In addition, N-scale gadgets were relatively expensive, and there were not as many used N-scale items on the market as there were in H.O. Therefore, I decided to go back to H.O. scale. A while later, one of my cousins took a liking to my N-scale stuff, so I let him have it for an affordable price. After selling my N-scale trains and track, I thought about adapting my H.O. layout to work on a 3 by 4 foot (0.9 x 1.2 meter) unit of industrial shelving I had in storage. The layout would fit on this shelving if I allowed the front of the board it was on to overhang the front shelf standards by a few inches. The shelving could accommodate the train layout - plus a lot of other things on shelves above or below it - all within the same footprint! In early 1992, I moved from Arizona to Pasadena, California in order to work at JPL. Since the job offer was on short notice, I started out by renting a room. This ruled out using even the shelving for a while. In early 1993, I was able to move to a kludged apartment (a converted garage) that had adequate space for my industrial shelves. The shelf unit would not look particularly good in my apartment, but hey, it was a bachelor pad! In addition to the basic two lap layout I had, I designed a companion layout which can be on a separate shelving unit. If the shelving units were not adjacent, the connecting track(s) could be run along a wall - perhaps on a suspension bridge! A great deal of flexibility can be added if the basic layout size is modestly increased to accommodate a partial or complete loop of track around the perimeter for a third lap. Replacing the crossover with a single or double slip switch would also add some spice. If one has an N-scale model railroad, the same track plan could fit into a standard metal cabinet, protecting it from little fingers, wild cats or dogs, dust, and who knows what else. Industrial shelving provides room for a model railroad without requiring dedicated floor space. In addition, the shelving provides a good way to mount lighting, backgrounds, and even provide a blue sky! I have now been able to keep the layout on industrial shelving for several years in a row, but I have not been able to spend the time on it I would like. All of the buildings have been in place for some time, but there was still some landscaping to do at the time I took the pictures for this web page. The theme of the layout is a rail park with a regular rail route around its perimeter, since small radius curves are more believable in a rail park setting. |
Images and Descriptions of Previous or Temporary Layouts:
|
|
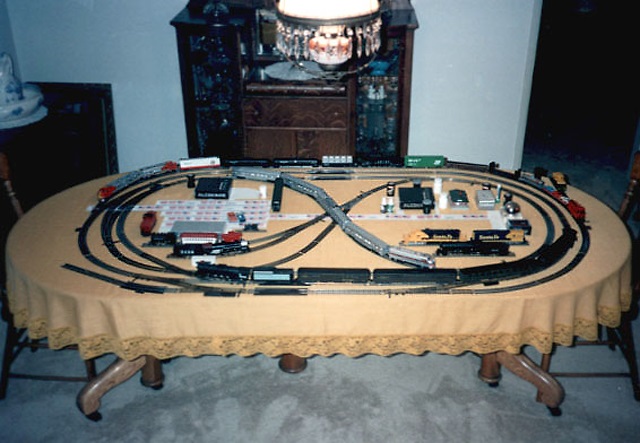
| H.O. track plan similar to the one I had on a four by eight board in high school, except this version has three loops instead of two. The added outer lap makes it possible to accommodate up to two running trains and provide parking for a third. Due to its smaller radius turns, the shown layout will fit on a 3.7 by 6.5 foot (1.1 by 2 meter) board. Other objects on the table represent roads, parking lots, buildings, and static displays which are a part of the newer design. | |
| |
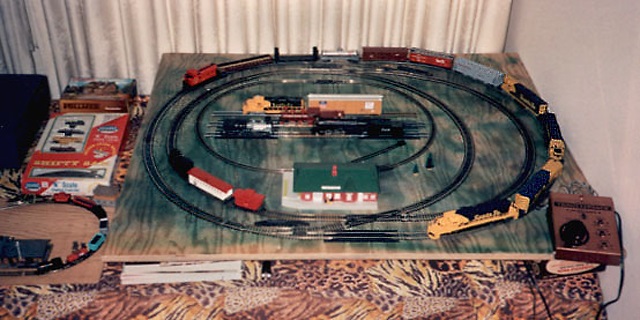
| Preliminary track plan for the Taubenberg Rail Park layout. The board is only 40 by 48 inches (1.0 by 1.2 meters). The Roco No. 4 curved switch (lower left) is instrumental in getting the layout to fit the required 48 inch width, while still allowing the inner oval to have a 15 inch (0.4 meter) radius and the outer one to have an 18 inch (0.45 meter) radius. The small oval in the center is N-scale, as are some items on the left side of the image. Due to the larger scale of H.O., I determined that I would rather have a relatively simple H.O. railroad than a more intricate N-scale one. 1990 photo. |
Return to Local Table of Contents
Plan View Images of Final Layout, with Descriptions:
| |
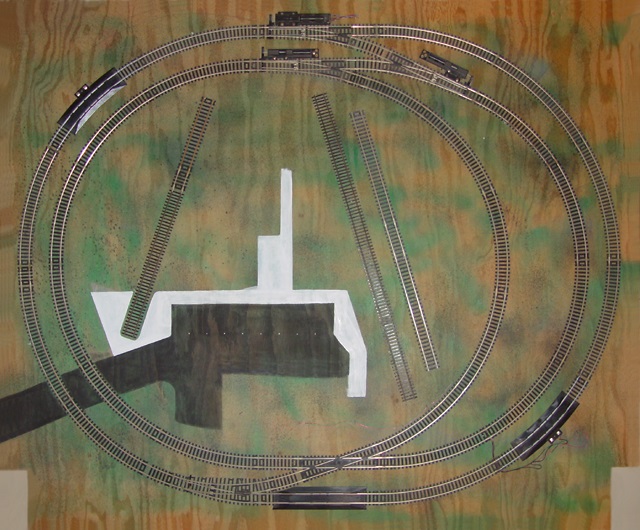
| Final track plan for the H.O. scale Taubenberg Rail Park layout. As in the previous picture, the board is only 40 by 48 inches (1.0 by 1.2 meters), but it now has two cutouts at the front corners, to simplify using it in 3 x 4 foot industrial shelving. The track is wired in three blocks. The first block is the inner loop and the curved inner track that connects the inner and outer loops. The second block is slightly more than the left half of the outer loop. The third block is the right end of the outer loop. The layout is capable of running one train in a double loop (while another train is parked on the right side of the outer loop), or two trains on single loops. A train station goes toward the front center (near bottom of picture), and an inn and church go beside and behind the light walkway. A tunnel goes over some of the innermost curved track. This layout uses 15 and 18 inch radius sectional track. Tests of various locomotives show that it is practical to make the inner loop as small as 14.25 inch radius, and the outer loop as small as 17.0 inches. This may be implemented later, in order to keep the front of the layout from projecting as far from the 4 x 3 industrial shelves. | |
| |
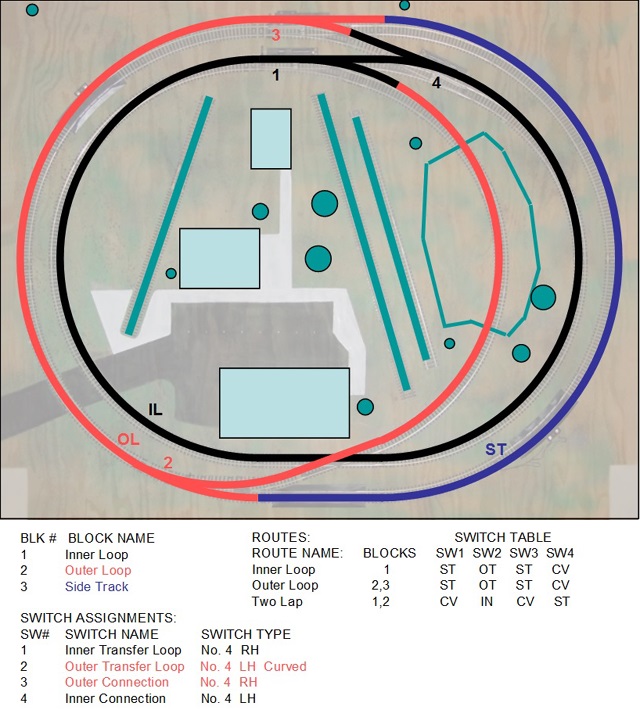
| Diagram of Blocks and Switches on the Taubenberg Rail Park Layout: - Block 1, shown in black, is the inner loop. - Block 2, in red, is the left side of the outer loop, plus the transfer loop to and from the inner loop. - Block 3, shown in blue, is the right half of the outer loop. - Block 1 facilitates a single lap route on the inner loop. - Blocks 2 and 3 together facilitate a single lap route on the outer loop. - Blocks 1 and 2 together form a double lap route around the layout. - Block 3 was implemeted so one train could be parked while another runs on the double loop. - Straight green lines near the middle are for display locomotives or short trains in the rail park. - Green circles represent trees. The irregular green outline at right is the footprint of a Kibri tunnel. |
Return to Local Table of Contents
Images and Descriptions of Taubenberg Rail Park:
|
|
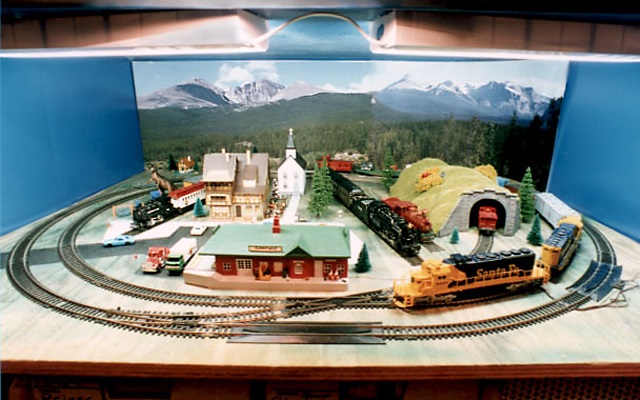
| The entire Taubenberg (Dove Mountain) Rail Park layout is set up in a three by four foot industrial shelving unit. Two fluorescent fixtures fastened to the upper shelf provide excellent lighting. Mountains in the background are matte sprayed 20 by 30 inch (0.5 x 0.75 meter) poster prints from my photos. The tall building toward the left is a custom combination of a modified Vollmer Village Inn Rathskeller, Vollmer restaurant tables and fixtures, and parts such as extra doors and steps. Other items include a Bachmann passenger train station; a Life Like church building; various automobiles, busses, and trucks; a Vollmer playground (with some added scale dinosaurs); Model Power people; Bachmann park items; Dyna-Model cats; a Kibri tunnel; and various trees. Photos in this group taken in 1993. | |

|
|
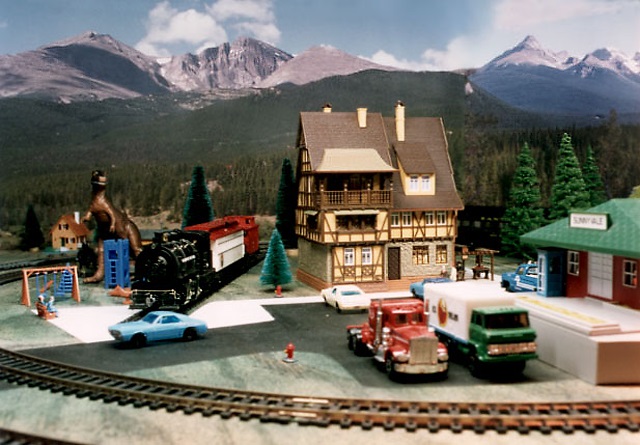
| This image shows the center of the layout. Locomotives in the foreground are normally static displays, but I can run them by manually transferring them to the route trackage. A rail park theme provides for realistic static displays. This and most other closeups were taken with a 14 mm wide angle lens. | |
|
|
| This view from just left of center provides a good view of the photographic mountain background. Colorado's Long's peak is the central mountain in the left group. Mountains on the right are from a photo I took in British Columbia. The contour of both sites just happened to match. Note the quality of light provided by the two shelf mounted fluorescent fixtures. | |
|
|
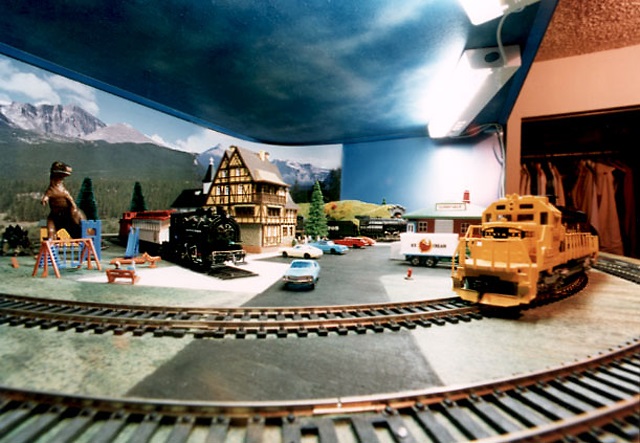
| Taubenberg Rail Park from the left side, with the static 0-4-0 Dockside display near the center. The bottom of the upper shelf is painted light blue, with a few clouds added just for fun. The upper shelf is only 15 inches (0.4 meters) above the track. The layout surface is envisioned to eventually include scale grass and other items which are more realistic than its current painted features. Layout close-ups were taken with a Sigma 14mm f/3.5 lens and a Nikon N2020 camera. | |
| Return to Local Table of Contents |
|
Recommended Reading: Steps to a Successful Eclipse Expedition, by Jeffrey R. Charles
Return to Local Table of Contents |
|
© Copyright 1990, 1993, 1998, 2022 Jeffrey R. Charles. All Rights Reserved.
Mail to: Jeffrey R. Charles (jcharles *at* eclipsechaser *dot* com
Document created: 25 March, 1998 |